In previous tutorials about Sentiment Analysis and our Excel add-in, we showed you step by step how to carry out a sentiment analysis with an example spreadsheet. In the first tutorial we focused in how to do the analysis, and then we took a look at the global polarity we obtained. In the second tutorial, we showed you how to customize the aspect-based sentiment analysis to detect exactly what you want in a text through the use of user dictionaries.
In this tutorial we are going to show you how to adapt the sentiment analysis to your own subdomain using of our brand new sentiment model customization functionality.
We are going to continue to use the same example as in the previous tutorials, as well as refer to some of the concepts we explain there, so we recommend to check them out beforehand, specially if you are new to our Excel add-in. You can download here the Excel spreadsheet with the data we are going to use.
The data we have been working on are restaurant reviews extracted from Yelp, more specifically reviews on Japanese restaurants in London.
In the last tutorial, we saw that some of the results we obtained could be improved. The issue in these cases was that certain expressions do not have the same polarity when we are talking about food or a restaurant than when we are using them in a general context. A clear example of this is the verb ‘share’. It is generally considered something positive, but in restaurant reviews it’s mostly mentioned when people order food to share, which has little to do with the sentiment expressed in the review.
This is where the sentiment model customization functionality helps us: it allows us to add our own criteria to the sentiment analysis.
Let’s see how to do this!
Step 1: create a new model
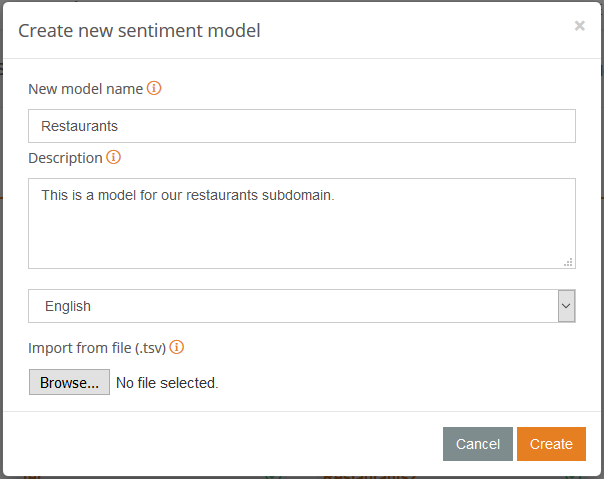
To do this you just have to access the sentiment models dashboard (available once you log in to your MeaningCloud account) and click on the big plus sign.
This will open a dialog where you can define the name of your new model (in our case we are calling it “Restaurants“) the language we are defining it to (English), and optionally, a description of the dictionary’s purpose.
Step 2: add entries
Once we have created the model, we can start adding the entries for the different sentiment behaviors we want to define for our subdomain. We are going to start with the example we used earlier: the verb ‘share‘.
One of the reviews in our spreadsheet contains the following sentence:
“We ordered the gyoza and pork and prawn buns to share.“
When we test this sentence, we obtain that its polarity is positive. If we check the output a bit more in detail, we can see that as we suspected, the reason behind this is that ‘to share‘ is considered positive.
And so the first thing we are going to do is to create an entry so the verb ‘share‘ does not have a polarity. This is how we do this in the “Add entry” section:

Once we do that, we click on Save and the new entry will be added to the list.
To test what this new entry we have added does, we just have to click on the button “Test” on the left sidebar, to be redirected to the Sentiment Analysis test console. If we paste the sentence in the Text field, we see that with the new sentiment model, instead of positive the sentence now has NONE as its polarity value.
Let’s see another example, this time a bit more complex. If we check the results of the aspect-based analysis we find another case in which we can ‘fix’ the sentiment: to consider that when ‘cook‘ is preceded by ‘freshly‘ or ‘recently‘, it will be positive.
The first clue of the fact that the configuration of this entry is not going to consist on just adding a polarity to a word is that the behavior is not associated to a word, but to a word in a specific context. To do this we are going to use subentries, which is how we can define sentiment behavior associated to specific cases of the same word.
Subentries are always associated to an entry, so the first thing we do to define the behavior we’ve explained is to create a new entry for ‘cook‘ similarly to what we’ve done for ‘share‘. The only difference in this case is that we don’t want to assign a polarity to the word, so instead of choosing the polarity Entry type, we will leave the field blank.
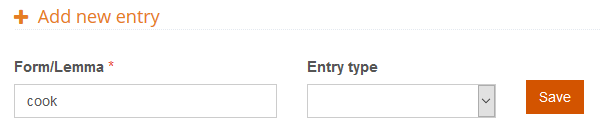
When we click on Save the new entry is added to the list, and from there we can access the entry edition view, which is the menu from which we will configure it further.
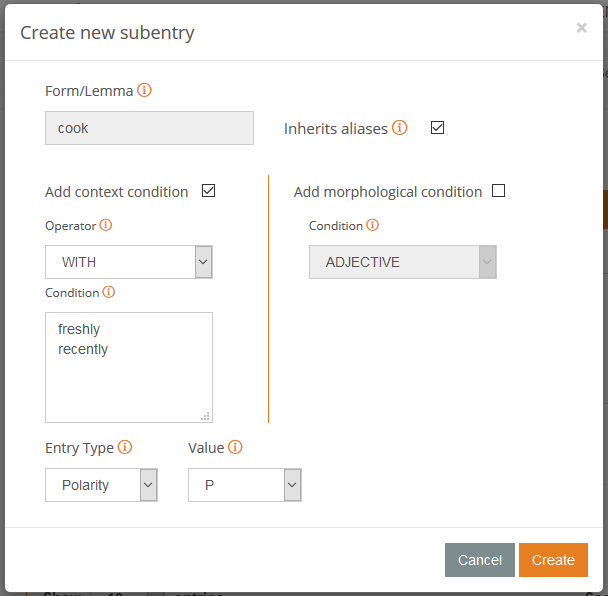
If we click on the “Add new” button, the dialog to define the new subentry will appear (check the image on the left).
What we want to specify is that the entry ‘cook‘ will be positive when it appears in the same context as ‘freshly‘ and ‘recently‘. In other words, ‘cook‘ will be positive when it appears with ‘freshly‘ and with ‘recently‘.
We can easily configure this by clicking on the checkbox next to “Add a context condition“, and then selecting how the context is going to apply (in this case we select WITH), and then the context condition.
It is important to remember that much the same as the Form/lemma of the entry, the context condition will be considered a lemma if possible. This means that if we use in the condition ‘cook‘, then it will also apply when in the text appears other variants such as, ‘cooked‘.
After the context condition, the only thing left to add is the polarity we want to assign, and then click on Create.
A common question when we have cases such as these is how to decide which word is the entry and which word is the context condition. A possible way to solve this is to think what would happen if the sentence was affected by a negation.
For instance, if we wanted to define that ‘price’ and ‘low’ in the same context have a positive polarity, if define ‘price’ as the entry and ‘low’ as the context, in a sentence such as this: “The prices weren’t low enough for the quality of the food.“, the negation would not affect ‘prices’, and the overall result would be positive (which is not what we want).
By assigning the polarity to ‘low’, it would be affected by the negated verb that precedes it, and so the resulting polarity for the sentence would be negative.
Following these criteria we are going to create more entries in our model to cover more of the cases that we have detected by working on our subdomain. You can download here the final version of the model, in case you want to import it in a blank model.
Step 3: analyze texts using your new model
Now that we have defined all the entries we wanted for our new sentiment model we can use it from Excel, and check how it improves the results we had obtained with the general domain model.
This step is going to be very similar to what we did in the previous tutorial.
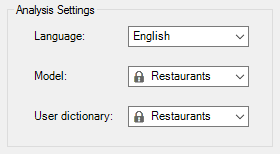
The user sentiment models behave similarly to the user dictionaries, and so when a sentiment model is created with the license key saved in the Settings section of the add-in, it will be loaded automatically.
In other words, once you have defined your model in the sentiment model customization console, it will be immediately available in the field Model, the drop down menu used to select which model to use in the Sentiment Analysis you can do from Excel.
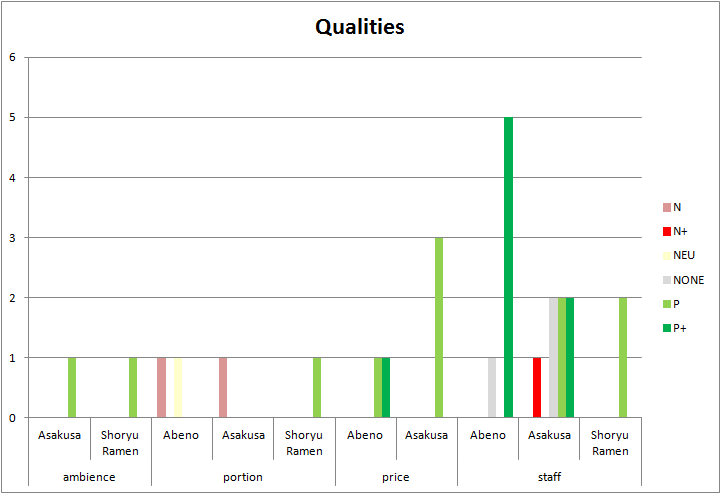
Using this configuration, we carry out the same analysis as we did in the previous tutorial. These are the new charts we obtain:

We’ve obtained both charts by inserting a pivot chart from the filtered data. The first one is a clustered column chart, which we will configure as follows:
- In the Axis fields area, the fields Form and ID, in that order.
- In the Report filter area, the field Type filtering by Top>Restaurants>Qualities.
- In the Legend fields area, the field Polarity.
- In the Values area, the field Polarity configured as “Count of Polarity”.
After that, and tweaking a bit the colors, we obtain the graphic on the right, where we can compare the polarities detected in the reviews for the same qualities for each one of the restaurants.
The second chart is pretty similar to the first one. This time we are using a clustered bar chart, and the configuration changes in two things:
- Instead of filtering by qualities, we are selecting the dishes, so the field Type filters now by the value Top>Restaurants>Dishes.
- The order of the fields in the Axis fields area changes: ID will appear first and then Form.
The overall results don’t change a lot from what we obtained using the general sentiment model, but we can see some differences in the Qualities chart. We can trace this differences directly to several texts that are now better analyzed thanks to the entries in the example model we have used.
You can download the spreadsheet with the results and the complete analysis here.
Much the same as with the dictionaries, once you define the sentiment model you need for your domain, you can use it in as many analyses as you want, ensuring that all your analyses and all the data derived from them will be analyzed exactly as you want. This improves not only the results, but also the efficiency in which you are able to carry out complex analyses over large collections of data.
If you have any questions, we’ll be happy to answer them at support@meaningcloud.com.