As you have probably know by now if you follow us, we’ve recently released our new customization console for deep categorization models.
Deep Categorization models are the resource we use in our Deep Categorization API. This API combines the morphosyntactic and semantic information we obtain from our core engines (which includes sentiment analysis as well as resource customization) with a flexible rule language that’s both powerful and easy to understand. This enables us to carry out accurate categorization in scenarios where reaching a high level of linguistic precision is key to obtain good results.
In this tutorial, we are going to show you how to create our own model using the customization console: we will define a model that suits our needs and we will see how we can reflect the criteria we want to through the rule language available.
The scenario we have selected is a very common one: support ticketing categorization. We have extracted (anonymized) tickets from our own support ticketing system and we are going to create a model to automatically categorize them. As we have done in other tutorials, we are going to use our Excel add-in to quickly analyze our texts. You can download the spreadsheet here if you want to follow the tutorial along. If you don’t use Microsoft Excel, you can use the Google Sheets add-on.
The spreadsheet contains two sheets with two different data sets, the first one with 30 entries, the second one with 20. For each data set, we have included an ID, the subject and the description of the ticket, and then a manual tagging of the category it should be categorized into. We’ve also added an additional column that concatenates the subject and the description, as we will use both fields combined in the analysis.
To get started, you need to register at MeaningCloud (if you haven’t already), and download and install the Excel add-in on your computer. Here you can read a detailed step by step guide to the process. Let’s get started!
Step 1: defining our model
1.1 Create a model
As we have said, we want to categorize the tickets we receive at support, so the first step will consist on creating the model we are going to use.
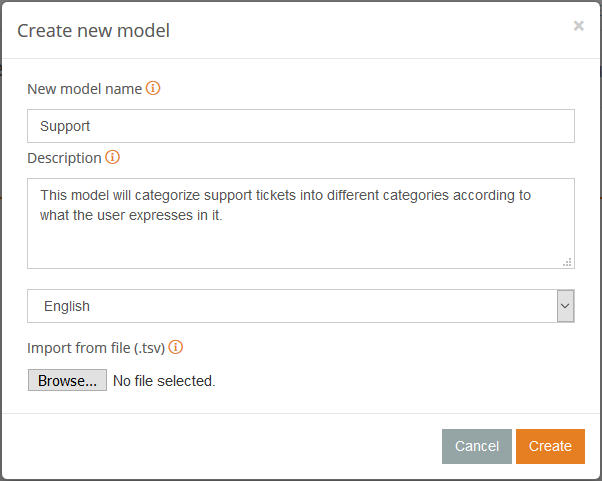
To do this, just access the models dashboard (available once you log in to your MeaningCloud account) and click on the big plus sign.
It will open a dialog where you can define the name of your new model (in our case we are calling it “Support”) the language in which we are creating it (English), and optionally, a description of the model’s purpose.
1.2 Add categories
Once we have created the model, we can start adding the categories that we are going to use to categorize our tickets. The categories in each model will depend on the domain and the level of precision that needs to be reached. A typical classification for issues is the following: Bug report, for unexpected behaviors, Information request, for questions or clarifications and Feature requests, for changes requests of the functionality provided.
We are going to base our model in this typology, although we are going to change it a little bit to better fit both our internal processes as well as what we see in our support portal. These are the categories we are going to define:
- Bug report- Web: unexpected behaviors in the website.
- Bug report- APIs: unexpected behaviors in any of our APIs.
- Bug report- Integrations: unexpected behaviors in any of our integrations.
- Information request: questions or clarifications.
- Sales: pricing or subscriptions questions.
- Sales – Academic: requests for academic plans.
Creating categories is extremely simple: we just need to set a code for it (how we will univocally identify it in the system) and its label. Below you can see how we created the category for Bug Reports in the APIs.

Other than the code and the label, on category creation we can also configure if the category will be the default category for the model. This does exactly what it says: sets a category as the default one for the model, assigning it to any text that’s not categorized into any other category. In our scenario, this is going to be extremely useful, as on the one hand, we always want any ticket we receive to be assigned a type, and on the other hand, a large percentage of the tickets received are Information requests.
By creating these categories, we’ve defined the different “boxes” in which our texts are going to be sorted, but we still have to tell the system how to decide in which box to put each ticket. In other words, we need to define the criteria for each one of the categories we’ve created.
Step 2: rule creation
As we have said in the introduction, one of the advantages of Deep Categorization lies in the powerful rule-language supported. From basic logical operators to semantic information or distance operators, there’s a huge amount of information from the text that can be accessed in a very simple way.
Let’s start with a simple case: validation emails. When someone registers in MeaningCloud, they need to validate their email account through a link sent in a validation email. There are instances in which this mail is not received, and so users contact support. Typical ways of expressing this are “I did not receive the validation mail” or “I’m waiting for the validation email“. Let’s see a possible rule to cover these cases:
receive|wait AND "validation|confirmation e-?mail|mail"
| I didn’t receive the validation mail I’m still waiting for the confirmation email I’m waiting confirmation that you have received my e-mail |
Here we are combining the capabilities of the logical operators AND and OR (expressed as |), the possibility of defining literal expressions using double quotes, the lemmatization of words (which is the default behavior unless otherwise stated) and the support to regular expressions.
Rules are created from the category editing view.
By clicking on the “+ Add new rule” button, the fields available will appear. In the image on the right we can see the values we’ve filled in for the rule examples we’ve just seen.
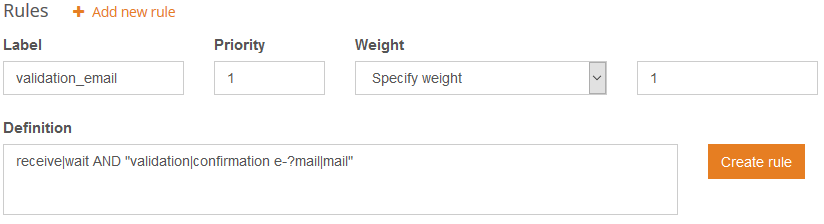
In the rule creation we can define the priority assigned to the rule as well as its weight.
- The priority determines the impact of the rule in the results: the higher the priority value, the later in the process it will be applied, making it more determinant of the final outcome.
- The weight defines what will happen to the category the rule belongs to: it will be included in the results, it will be excluded from the results or a numeric weight will be added to its relevance. In this case, we are adding a weight of 1.
Once the rule is created, we can access it by clicking on its label. In the rule editing view, there are two additional fields we can edit: the comments and the active checkbox. In the comments we can write whatever we want that may help us in the rule management. In our case, we are adding a brief description and the examples we want to cover so anyone that works on the rule can easily know what its goal is. The active checkbox allows us to activate/deactivate a rule. This is extremely useful when we are fine-tuning our model or to see the effect a rule has in our results.
So, now that we have defined our rule, let’s test it!
To do this we are going to follow a process similar to the other MeaningCloud user resources: we’re going to use the test console available for the API the resource is used in, in this case, Deep Categorization. We can access the console directly from the customization console by clicking the Test button in the sidebar on the left. By doing this, the console will be loaded with three relevant parameters ready for our testing:
- model, with the value of the model we are testing.
- debug, enabled to see the rules that are being triggered.
- verbose, enabled to see the terms used in the categorization.
If we test the texts we have previously defined as the cases we want to cover, we can see that our rule works as expected. Hooray!
Step 3: advanced rules
Following the same process as in the previous section, we can define rules that cover the different scenarios that apply to each one of the categories we have defined for our model. Let’s see some of the more advanced operators available that may help us in this.
Semantic information
One of the many advantages of using the morphosyntactic and semantic analysis of the text is precisely the fact that semantic information is available to use in the rules. This information is something that we can customize with our own ontology/taxonomy. By defining rules using semantic information, we cover easily many cases and make the categorization more scalable. But let’s see an example to illustrate what we are talking about.
Among the categories we have defined for our tickets, there are two that seem ideal candidates for this: “Bug Report – APIs” and “Bug Report – Integrations“. These two categories aim to cover those tickets where a bug in any of those products is reported, so it makes sense for us to want to detect mentions of those products.
To detect them we are going to define a user dictionary. In it, we will create entries for all of MeaningCloud’s APIs and integrations, assigning them the corresponding ontology type: “Top>Product>API” and “Top>Product>Integration“. If you have never worked with user dictionaries, you can check this tutorial out to familiarize yourself with what they can do.
If you are following the tutorial along, you can download the dictionary we have created here and import it in your account.
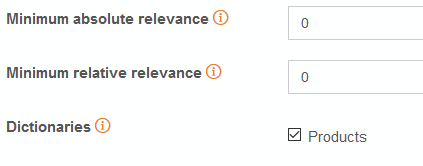
Once we have created the dictionary, we just need to indicate the deep categorization model that we want to use that dictionary in the analysis. We will do this in the settings menu of the model. At the bottom, any user dictionary that we have created in the same account will appear available to select.
We check the “Products” dictionary and click the “Save” button
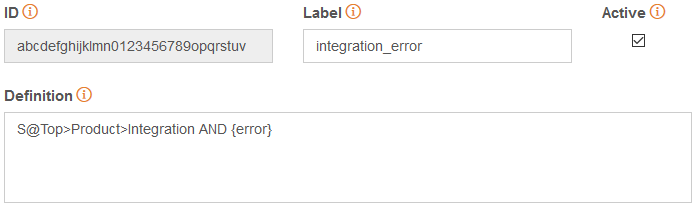
Now we can define our rule. We want a text to be categorized into “Bug Report – Integrations” when words that denote a problem are mentioned with any of our integrations. As we have defined a semantic type specific for integrations, Top>Product>Integration, we will define a rule using that information and adding the context that indicates a possible problem with it:
S@Top>Product>Integration AND error|bug|issue|problem
| I am trying to install the VoE plugin but keep receiving the below error |
Similarly, we will define the corresponding rule using the Top>Product>API type for the “Bug Report – API” category.
Defining macros
A very common situation when creating rules for a model is that certain lists of words or expressions will repeat in different categories/rules. In general, they are lists of words that even though they are not strictly synonyms, they are used as such. We’ve just seen an example in the previous section, where in two different rules we’ve used “error|bug|issue|problem” to define a context.
To cover these cases, macros can be defined. They support the same syntax as the rules, and they are referenced using their label in curly brackets.
Let’s see an example and how it would look in the rules we defined in the previous section:
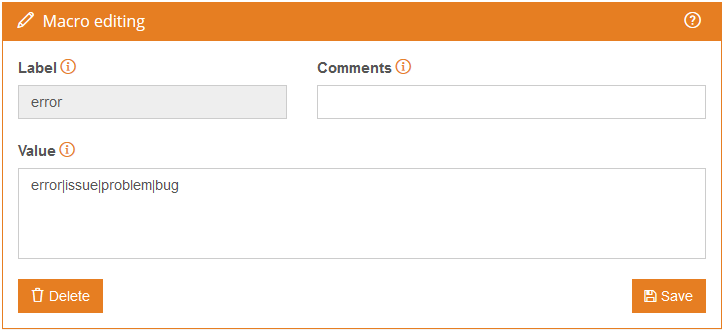
By using macros, rules are easier to read and we can ensure that the definition and maintenance of those lists is only in a single place.
Referring to categories
When we tested the rules we have defined for the “Bug Report – Integrations” category, we found a false positive, that is, instances where a category is returned when it should not. MeaningCloud’s integrations offer ways to use our APIs from different platforms and without needing to code. This means that it’s common for APIs to be mentioned when reporting bugs from one of the integrations.
Check out the following text and on the right, the categorization returned for it:
| Hi, I’ve received an error message when using the sentiment analysis tool for Excel that says “you don’t have access to this sm/model yet” |
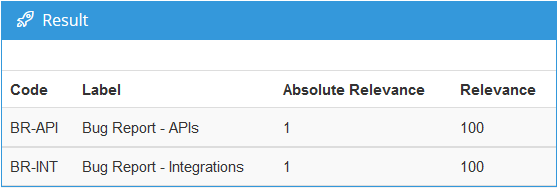
The ticket clearly refers to the integration with Excel, but the Sentiment Analysis API is mentioned too. So how do we get rid of these false positives?
One of the features we mentioned when we started creating rules is the excluding behavior we can assign to the weight value, that is, we can make that when the rule is triggered, the category it belongs to is excluded from the results. This fits quite well with what we need to do.
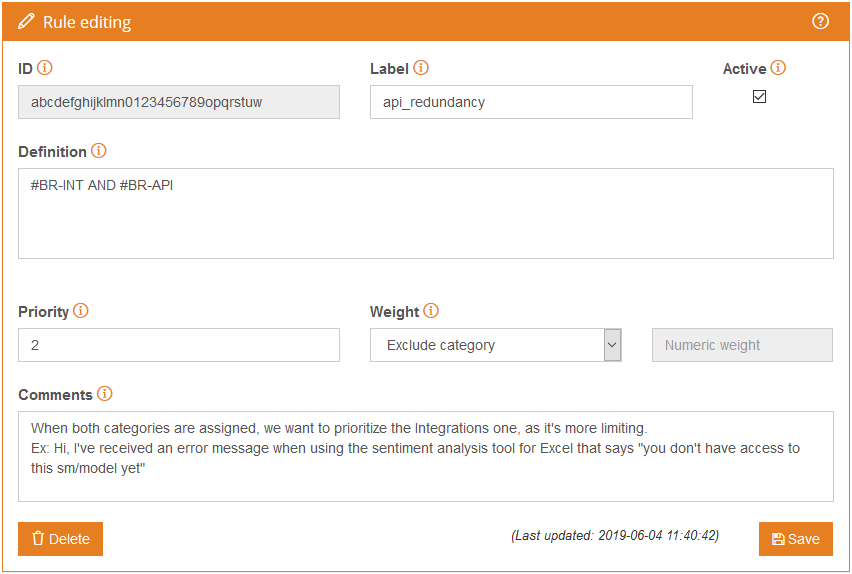
A possible way to approach this would be to define the same rules as we have for the “Bug Report – Integrations” and make them excluding conditions for the “Bug Report – APIs“, but this is costly and difficult to maintain. Instead, we are going to define rules where we refer to the categories assigned to the text. This enables us to select what to do when both categories appear.
Categories can be referenced by using their code preceded by #. On the image below, you can see how the resulting rule looks.
We have defined a new rule that excludes “Bug Report – APIs” when both “Bug Report – APIs” and “Bug Report – Integrations” are assigned to the text.
One of the things to take into account when creating excluding rules is the fact that we want them to be run at the very end of the categorization process. This ensures that the category will not be assigned again by another rule after being excluded.
To do this, we will assign these rules a higher priority than to the rest. Rules are applied by priority, starting by the lowest and finishing by the highest, as the last ones to be run have the more lasting impact on the categorization.
Step 4: Testing and fine-tuning
Once we have created a first version of our model, we can easily test it against the set of data we have extracted from our ticketing system. If you have read some of our previous tutorials, you are probably already aware of how easy it is to use the Excel add-in (or Google Sheets add-on) to test, validate and fine-tune your model.
This is precisely what we have done with our model. You can download the final version here and import it directly into your account.
There are two additional tools we provide to make this fine-tuning process easier: the test parsing console and the model view, both available on the sidebar on the left of the model.
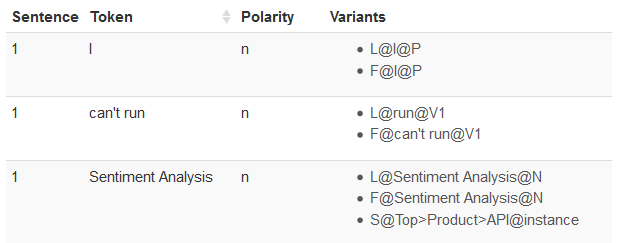
The test parsing console provides a way to see exactly the morphosyntactic analysis we will obtain for a given text. It shows us how the text is tokenized and lemmatized and a list of variants to help us see which operators/rules will match with our text.
On the image on the right, we can see the parsing returned for “I can’t run Sentiment Analysis“. We can see the tokens in which the text is divided (very helpful when using the distance operator) with all the information associated to them: their lexical form, their lemma, the morphological analysis, and in the cases it applies, the semantic information.
In this specific example, we can see that our dictionary is being used, as “Sentiment Analysis” is a single token with the semantic analysis we have defined (“Top>Product>API“).
The model view let us see the rules we have defined for our model and the order in which they are run, which can be very useful. It also let us see how big or complex is our model. In our scenario, we have created in less than an hour a model for six categories that works reasonably well using less than 20 simple rules. Not bad!
Another advantage of these models is how agile their maintenance is. Take for instance the following scenario: a new product is published and we want to take it into account in our “Bug Report – APIs” category (or “Bug Report – Integrations” if the product is an integration). Instead of retraining the whole category with examples of tickets referring to the new product, we just have to add it to our dictionary, and it will automatically start to apply to our category.
You can download the spreadsheet with the results, the analyses and evaluations we have used here. As you can see, defining your own model is quite easy, specially with the help of our Excel add-in to make the training and optimizing process more agile.
If you have any questions, we’ll be happy to answer them at support@meaningcloud.com.